
Measuring for a new door
The most expensive words in the door-fitting trade are "I measured it myself." We say that with real sympathy, because measuring a door opening looks like one of the simplest jobs in a house, and in fairness it very nearly is. The problem is not the difficulty. It is that two entirely different methods exist, that they contradict each other, and that almost everything written about the subject muddles them together.
Here’s the main point: For an internal door in an existing frame, use the largest measurement and trim the door to fit. For a replacement external doorset with a frame, use the smallest measurement and subtract 10 millimetres. Using the wrong method can leave you with a door that won’t fit or one with a gap big enough for a letter.
We’ve measured many openings across Cheshire and have often been called to fix mistakes from others. Most problems stem from one main confusion or from three common errors: measuring the old frame instead of the brickwork, forgetting the cill, or getting the hanging direction wrong. Any capable homeowner can do this. The key is knowing which method to use and sticking to it carefully.
Next, we’ll clearly explain the two methods, then guide you through measuring an internal opening, measuring brick-to-brick for a replacement doorset, handling side panels and top lights, understanding standard sizes and trimming limits, and addressing hanging and floor-level issues. We’ll also let you know when it’s best to call in a surveyor.
Internal and external doors differ completely
This difference is crucial, so it’s important to be clear about it. An internal door is just the door leaf. The frame is already in place and stays there, so your job is to find a door that fits inside it after a bit of planing. Since you can only make the door smaller, use the largest measurements and trim down. In this case, it’s better to be generous with your measurements.
A replacement external door is usually a complete doorset, which includes the door, frame, hinges, lock, and often a cill, all made as one unit to a fixed size. You can’t trim a uPVC or composite doorset. If it’s even a millimetre too big, it won’t fit.
Choosing a larger size and cutting it down works for internal doors but is risky for external doorsets. If you order an external frame that’s too large, you’ll need a remake, which means weeks of delay and no recourse if you ordered it yourself. Suppliers clearly state they don’t allow for fitting on customer-supplied sizes.
Here’s our clear advice: If you’re hanging internal doors, measure them yourself with confidence. If you’re ordering an external doorset, especially one with a side panel or top light, have the installer survey it so they’re responsible for the measurements. Select Window Systems offers this service for free, and we would rather cover that cost than deal with a remake.
Measuring an internal door opening
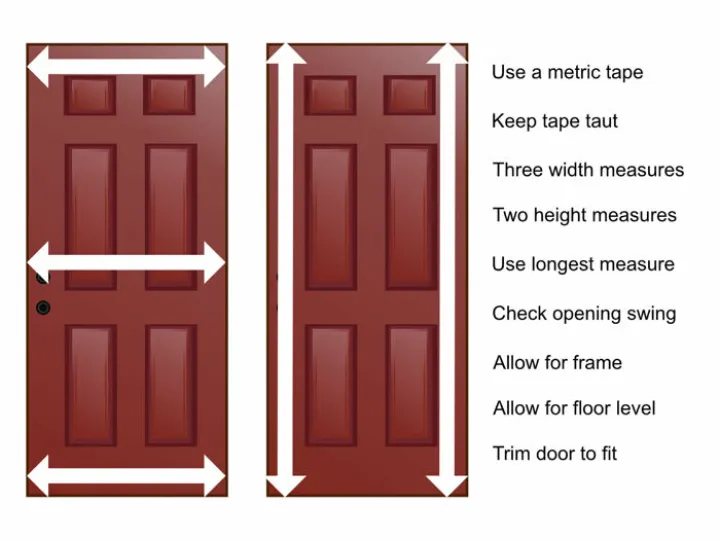
If the frame stays, measuring takes about 15 minutes with a steel tape. Start by measuring the width inside the frame, from one jamb to the other. Take three measurements—at the top, middle, and bottom—keeping the tape straight. Write down all three in millimetres and use the largest one.
Next, measure the height from the finished floor to the underside of the frame head. Take a measurement on the left and right sides, and use the larger one. In many older Cheshire homes, floors can be uneven, so expect the numbers to differ more than you might think.
Finally, check the depth, which is the thickness of the door the frame is made for. Most internal doors are 35mm, 40mm, or 44mm thick, so your frame’s rebate should match one of these sizes.
You can measure the existing door if it fits well, which is a good way to double-check. However, the frame is always a more reliable reference. Over time, doors are planed, packed, and adjusted, so the current door might not reflect the true size of the opening.
From our experience, it’s also important to check the diagonals. Measure from corner to corner both ways. If the numbers differ by more than five millimetres, the frame isn’t square, and the door will need to be shaped rather than just trimmed. It’s better to find this out before you buy the door.
Measuring brick to brick for replacement doors
This method is crucial when ordering a new external doorset, and there’s little room for error. Measure from the outside, taking the size of the structural opening from brick to brick. Don’t measure the old frame, door, or cill. The old frame has extra space packed around it, so using it as a reference could make your new doorset 10 or 15 millimetres too small.
For the width, take three measurements across the clear brickwork opening: one just below the lintel, one in the middle, and one just above the cill. Write down all three and use the smallest one.
For the height, take three measurements from the floor or threshold up to the underside of the lintel—on the left, in the centre, and on the right. Use the smallest one. Then subtract 10 millimetres from both your width and height measurements. This gives about five millimetres of space on each side, which fitters need to install the frame properly. All reputable suppliers follow this rule.
There are two things people often forget. Your measurement must include the frame, cill, and any frame extenders, since they’re all part of the ordered size. Also, if the reveal is rendered instead of brick, you’ll usually need to cut back the render to find the true opening.
Finally, check the diagonals here as well. If the two measurements differ by more than five millimetres, the opening isn’t square. Installing a square doorset in an uneven opening will cause problems, so it’s best to know this before ordering.
Side panels, top lights and awkward openings
When the doorset includes more than just a single leaf and frame, you’ll need two extra measurements. These are often recorded incorrectly.
For a side panel, you still need the total brickwork width and height, measured and reduced exactly as above. Then you need the side panel width, which is measured from the centre of the mullion, meaning the vertical frame member dividing the door from the panel, out to the outer edge of the panel frame. Note that these are supplied as separate figures, the door frame width and the panel width, rather than as one overall dimension. Where there are panels on both sides, measure each one individually, because they are frequently not identical.
For a top light, you need the transom drop, measured from the centre of the horizontal transom bar to the top of the door frame. Again, this is supplied in addition to the overall frame height, not instead of it.
At this stage, two more checks are helpful—things a surveyor would do. First, check the plasterline inside the opening to make sure there’s space for the hinges and for the door to open. Second, check the floor line before choosing a threshold and cill, since installing a level-access threshold in the wrong spot can create an unexpected step.
This is the point at which we would gently suggest handing over. A single leaf in a square opening is a straightforward measure. A door with two side panels and a top light in a Victorian opening that has settled is not, and the cost of getting it wrong is the whole doorset.
Standard sizes, trimming limits and fire doors
Knowing the standard sizes tells you whether your opening is normal, which is useful information in itself. In England and Wales, the most common internal door is 1981 by 762mm, usually 35mm thick, referred to in the trade as a two-foot-six. In Scotland and in many newer builds, the metric equivalent of 2040 by 726mm at 40mm thick is standard. Where wheelchair access is a consideration, 1981 by 838mm generally provides the clear opening width that Part M expects.
Trimming allowances are where we would urge caution, because guidance varies far more than most people realise. The lipping, meaning the solid edge of the door, is what you are cutting into, and it is typically 12 to 20 millimetres. Some manufacturers permit six millimetres per edge, for a total of 12 millimetres. Others allow up to 16, or even 20, per side on doors with substantial lippings, and white moulded doors may allow only six. Exceeding the stated allowance can void the warranty.
Our honest advice: Don’t rely on general rules for trimming. Always check the manufacturer’s specific allowance for the door you’re buying. The range is too wide for a rule of thumb to be safe.
Fire doors are a separate matter and should not be trimmed beyond the manufacturer's marked allowance under any circumstances. FD30 leaves are 44 to 45mm thick, and FD60 leaves are typically 54mm. Note that these are thicknesses, not widths. For domestic use, specify FD30S rather than plain FD30, since the S denotes a cold smoke seal and smoke inhalation is what actually causes most fire fatalities. Building regulations require fire doors between an integral garage and the house, and to habitable rooms off the stairwell in properties of three storeys or more, including loft conversions.
Hanging, floor levels and common mistakes
Hanging a door sounds trivial, but it causes more remakes than any other single error. The convention most manufacturers and we use is that hanging and opening direction are viewed from outside the property. Stand outside, look at the door, and note which side the hinges are on. Get this wrong, and you receive a technically perfect door that opens into a wall.
Because conventions do vary between suppliers, we always confirm hanging and, wherever possible, with a simple sketch. A drawing on the back of the survey sheet has prevented more errors than any amount of terminology.
Floor levels are another common issue. If you’re adding a new floor covering after fitting the door, you need to allow for that extra height, or the door won’t clear it. Tile and underlay can add up to 20 millimetres. Decide on your floor finish before ordering and let the person measuring know.
Another common mistake is measuring the old frame instead of the brickwork. We’ve mentioned this before and repeat it because it happens so often.
One more mistake is rushing. Measure everything twice, ideally on different days, and write down the measurements in millimetres rather than relying on memory. When our numbers differ from a homeowner’s, it’s usually because we measured at three points and they measured only once.
When to measure and when to ask
Measuring for a door is about knowing which method to use. For an internal door in an existing frame, measure inside the frame, use the largest numbers, and trim down within the manufacturer’s allowance. For a replacement external doorset, measure the brickwork opening, use the smallest numbers, and subtract 10 millimetres from both.
Beyond that, three habits will help you avoid most problems. Measure at three points for every dimension and check the diagonals for squareness. Include the cill and any frame extenders in your measurements. And always confirm the hanging from outside.
If your opening is simple and you’re hanging internal doors, you can proceed with confidence. If you’re ordering an external doorset, especially with side panels or a top light, we truly prefer to come and measure it ourselves so that any mistakes are ours to fix.
For a free, no-obligation survey and quotation on doors anywhere in Cheshire, call our team on 01606 863553 or email hello@swsonline.co.uk, and we will bring the tape.
Select Window Systems
Phone: 01606 863553
Email: hello@swsonline.co.uk
Visit: Unit 2, Woodford Court, Winsford, Cheshire, CW7 2RB
Cheshire doors and windows.
Window and door installations across Cheshire.
Visit Our Cheshire Showroom
Disclaimer
Select Window Systems accepts no responsibility or liability for any damages or costs of any type arising out of or in any way connected with your use of this website. Select Window Systems cannot be held liable for any actions taken in reliance on any published content, which is for information purposes only.